It all began with a pink rose

or
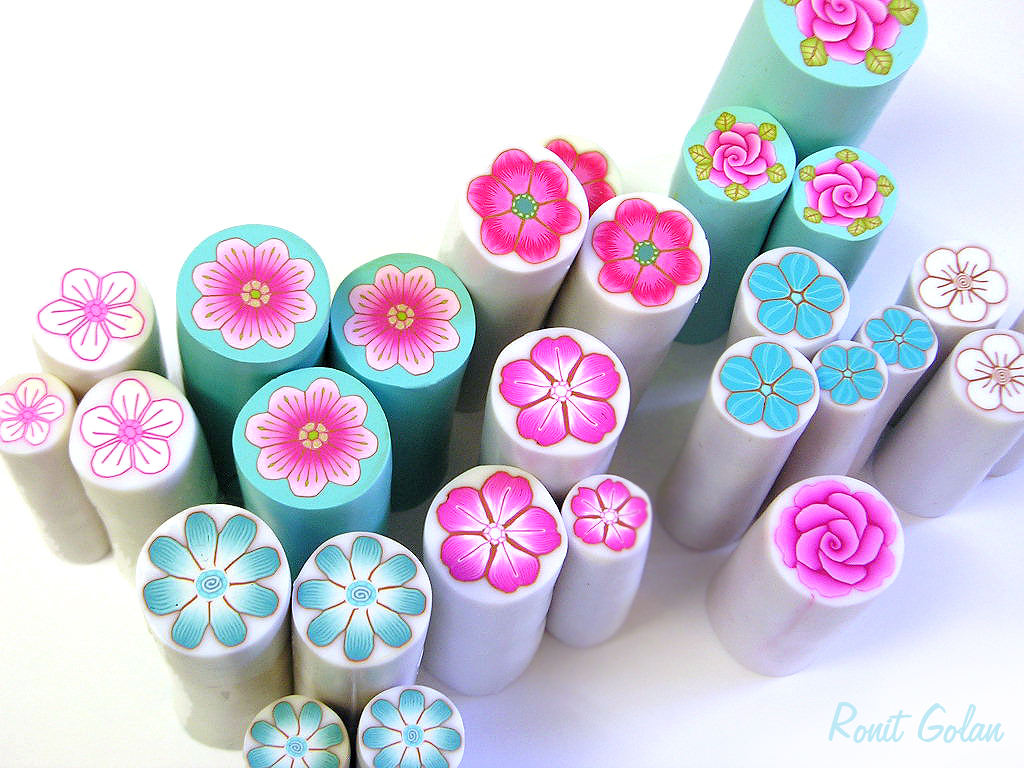
How do I make my key chains collections..... from the first rose cane.


If I want to inspire my self I build a vibrant pink rose cane, this color just stimulate my senses.


So now I have the pink and the green leaves, and I decide on a background color that will compliment the 2 basic colors. On this particular cane, because it was very big I've made 2 background colors, so that gave me the option to make 2 collections: the Pink-Greens and the Pink-blues.


I love the middle part, where the green and blue are melting into each other.


To characterize the collection and to give it a unique sweetness I've made a cupcake cane.


I love making millefiori canes with solid color background,
so in every collection I have this kind in addition to canes with transparent background.


Some of the canes can be used in several combinations, so I can play with them,
adjust and match them to my collections.


The next step is making the layered sheet for the big flower and heart main beads. I choose the canes that I want to incorporate on the surface and start making the layers; it takes me about 1 hour for one surface sheet.


and after 1 hour it looks like that :D


I use cookie cutters to create the beads, it is always a flower and a heart. I assemble the beads, add a slice from my logo cane on the side and cure them in the oven.


I have 5 different beads on every key chain, besides the large main bead. There is a lot of reducing canes, cutting  slices, rolling beads and a lot more until it goes to the oven. The beads are cured and cool down.


We are in the final step of "bead making", YAY, the beads are varnished and are left to dry,
and I can rest a bit too.


Until now, I couldn't see the true colors of the beads, only after they are cured, varnished and dry, their true colors shine.

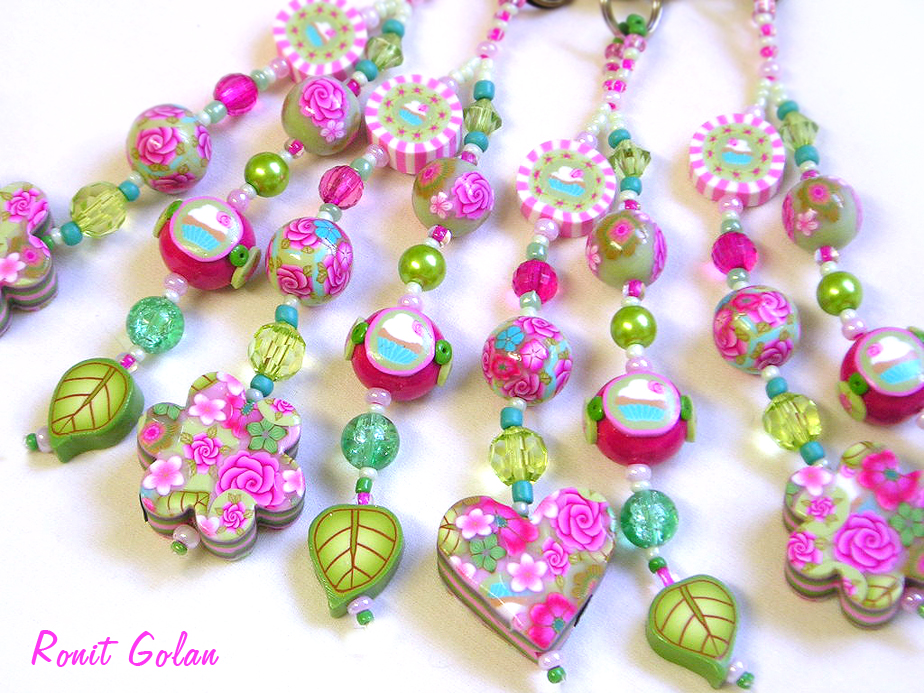
Here is the Pink~Green~collection


and the beads from the Pink~Blue~Collection


It is the last stage - I design the assembling of the key chain. I choose the beads from my inventory, seed beads, acrylic and glass beads.


I make one design to each collection and assemble the rest of the key chains the same as the first original design. It is very good for me because I do not have to reinvent my self with every key chain.


After a long journey from the first rose cane, my key chains are finished.


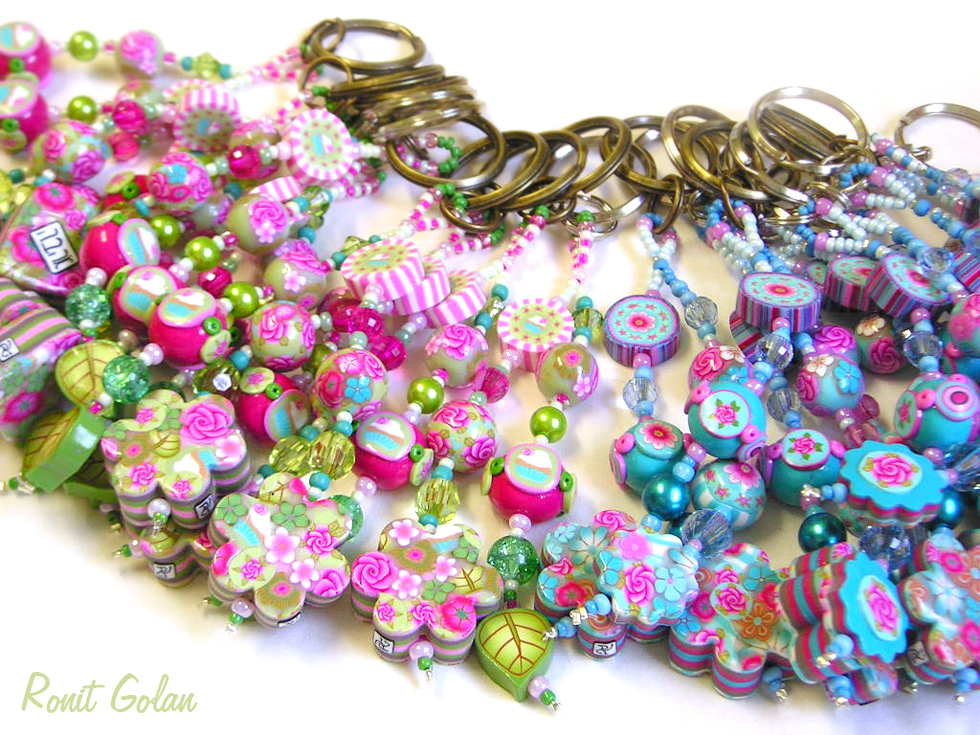
It is very exiting to see all the beads come together.


 I love how from each collection I make,
although you can see many colors,
there is a clear main color that shines through.


Hope you've enjoyed this presentation,
got some inspiration and experienced my passion for colors & design.

Have a great weekend

kisses!!!!

Playing with miniature food

Falling in love with miniature food is very easy; making cupcakes and donuts in miniature size is surprisingly sweet. I was looking forward for this day to just sit & play with my food... hmm... hmm.. miniature food!


........ everything is so little ........ 
  ..... when you are concentrated in these small parts - time flies away ......
...... in a good way ......


I've used silicone molds for the base of the donuts, cupcakes and for the whipped cream; for the heart cookie I used a little cookie cutter. On some of the pastries I've brushed chalk pastels for the baking effect. I've cured in advance little and long strings and after they've cooled down I've made from them small colorful sprinkles with the blade. I've used for the frosting liquid polymer clay mixed with clay and deco colors after the baking.


I decorated some of the clay sweets before baking, and the others after they've cooled down.


 I've made from these sweet embellishments hair accessories for little girls.


Headbands and hair pins combined with miniature food embellishments are fun and easy to make. These are a great idea for Christmas stockings gifts.


Happy Thanksgiving dear friends
Thank you for visiting my blog, enjoying and inspired by;
thank you for your warm comments, for spreading the word 
and for your love.


~ ~ ~   S h o p    u p d a t e   ~ ~ ~

{ Use Coupon Code - SALE30 upon checkout }


... enjoy crafting and shopping ...
&
~ have a fantastic weekend ~
kisses :-)


Scrap Cane Tutorial

Scraps from canes can be from any part or stage when constructing a cane;
it can be from the petals stage or the cane ends after reducing and cutting the edges.

For this particular cane it is good to have chunks of scrap canes, un-blended or mixed.
Scraps from millefiori canes that have transparent background can be use too in this
technique, there is an example at the end of this tutorial.


1.
Materials:
* Cane ends leftovers from several canes.
* Polymer clay in one color (variable amount) for the outline.
Tools:
Cutting blade, rolling pin, pasta machine and a ruler.

2.
Press each cane leftovers in to a ball.
Don’t try to squash or mash the ball, to avoid mixing it up.
Arrange the leftover canes from left to right to a color design for your liking.
Roll from each ball a cylinder (a roll) to a length of  4-5 cm / 1.5 - 2 inch


3.
Press each roll to a form of a rectangle, but keep their length the same,
about 4-5 cm / 1.5 - 2 inch.
Attached the rectangle pieces to each other, forming a thick rectangle sheet.

4.
With the rolling pin, flatten the thick sheet some more; but try to keep its shape as much as
you can in a form of a rectangle, do that by pressing at the sides of the sheet when needed.
The sheet thickness has to be about a 0.5 cm / 0.2 inch.

5.
Set the pasta machine on its thickest setting (1).
The rectangles shapes are going to be lengthened,
so the position of the sheet is vertical rectangles through the pasta machine.
Roll the sheet one time - this will be the "colored sheet".
Cut off the top and bottom sides of the sheet.

6.
For the outline - make a thin sheet (setting 4-5 on the pasta machine) in the size
(width and length) of the colored sheet.
Attached the outline sheet on to the colored sheet and gently press them together
with a  rolling pin (and take out any bubbles).


7.
Roll the 2 sheets together - set the pasta machine on its thickest setting (1).
Again, the position of the sheet is vertical rectangles through the pasta machine.
Roll the sheet one time.

8.
Clean the edges - from the 4 sides, cut the sheet to a form of a square.

9.
Cut the sheet to 5 equal pieces - measure the length of the sheet, divide it by 5
and cut it horizontally - from side to side, as described on pic 9.

10.
Place the 5 pieces one on top of the other and gently tighten them.


11.
Carefully reduce the stack to a rectangle form,
to a length of approximately 8-9 cm / 3 -3.5 inch.

12.
Clean the edges - from the 2 sides, cut the ends, so the pattern can be seen clearly.

13.
Cut the cane in to 2 equal pieces.
Attached the 2 pieces so the outline color is on the outside.

14.
Decide which side will be the middle of the triangle cane and tighten this side a little.
And on to the other side - add a thin sheet from the outline color,
to complete the sequence of the outline color.


15.
Form the cane in to a triangle cane by pressing inside on to the "middle side" corner
and gently pull the other 2 corners out.

16.
Reduce the cane length to about 8-9 cm / 3 -3.5 inch.
Clean the edges - from the 2 sides, cut the ends, so the pattern can be seen clearly.
Cut the cane in to 2 equal pieces.

17.
Attached the two parts, "middle side" to "middle side".
To form a triangle cane - press gently the "middle side" edge on to the work surface.
Reduce the cane length to about 6-8 cm / 2.5-3.5 inch.


18.
Cut the cane in to 2 equal pieces and attached the two parts to one square cane.

19.
Press gently on 4 corners to form a round shape.
Reduce and roll the cane to your desired size.

Ta Da !!!


A few steps from a scrap cane + Tip.
In this cane I've used a small amount of scrap clay, and got a cheerful colored cane; I chose white for the outline and it made the cane brighter. The outline color has a lot of influence on the overall appearance, so take that in mind when making this cane :-)


If you need help or have questions about this tut,
please leave that in a comment and I will gladly assist.

E n j o y !!!


Scrap cane Tut - soon to come

Scrap is one of the most annoying when working with polymer clay, but as many things it can be worked to your advantage. Sometimes I mix the scraps to new colors but sometime I like to experiment with it and see what will come out.

When I've uploaded this collection to my Flickr gallery - the "scrapy cane" was noted with some comments on it. A few days ago, while going through some pics, I've found that I've taken some pictures while I was experimenting with the scraps... yay!


I'm working on it these days and very soon I will post this tut on my blog. If you want to get updates on new posts, you can subscribe on the "Follow by email" on the right side of the blog, thanks!

.......................see you soon :))

From Cookie Pan to Ring Dish

It is a fact that polymer clay crafters convert any kitchen tool they can find to assist them with their clay creation. So, when I saw this Sugar Cookie Bowls recipe on Pinterest I thought to my self "Mmmmmmm... need to try this someday!".


..... well, the day has come, and I took out my cookie bowl pan and made little cute ring dishes.

Here they are, just before the oven, with my 3 favorite colors on their outside.


I've used varnish only on the inside


ring holder ~ ring keeper ~ ring dish ~ ring catcher ~ jewelry dish
you name it, they are small and cute :-)


Ring dish must have rings, otherwise it is just a small bowl ;-)


Making this dishes are fun, easy and very quick. They are not just cute, these dishes are useful, practical and great for little presents.


This is a great opportunity to invite you to follow my Pinterest boards and enjoy beautiful, fun, cool and exiting stuff that I love.


~ Have a great cool weekend ~